"I want to use Shopify POS to manage both online and offline sales and inventory."
"I want to know the specific steps for collaboration."
"I'd like to know more about the payment side of things when integrating Shopify POS."
This article is for you. By using Shopify POS, you can manage product information such as sales and inventory in real time for both your physical and online stores. You can use such convenient features from 9 USD per month.
In this article, we, certified Shopify Experts, will provide a detailed explanation of Shopify POS.
Key points of this article
- A simple guide to getting started with Shopify POS
- Learn about the "Light Plan" available from $9 per month
- We also introduce some tips and examples for using Shopify POS.
What is Shopify POS?
POS is an abbreviation for "Point of Sales."
Shopify POS is a POS system that is linked to a Shopify store, i.e. an EC store. You can manage product information such as sales and inventory in real time for both physical and online stores.
When you sell a product, the sales can be managed on the POS and the inventory quantity for that product is automatically deducted from the POS system.
Shopify POS is also compatible with iOS and Android, so you can use it on your smartphone or tablet by installing the app.
How to get started with Shopify POS
From here, we'll show you how to get started with Shopify POS in six easy steps:
- Step 1: Download the Shopify POS app
- Step 2: Add products to your store
- Step 3: Set up taxes
- Step 4: Set up your payment method
- Step 5: Purchase and configure hardware
- Step 6: Test your order to see if it works
Step 1: Download the Shopify POS app
First, download the Shopify POS app.

Shopify POS download page (official Shopify website)
Download "Shopify POS" on the device you want to use Shopify POS on and launch the app.
Enter your email address and password to log in to the app.
When using Shopify POS, please make sure that your terminal (device and version) is compatible.
Step 2: Add POS to your sales channels
If your sales channels don't include POS, add it.

Click the "+" button next to "Sales Channels" on the left sidebar of your Shopify admin screen.
Click the "+" button next to "POS" in the "Add Sales Channel" window.
Then, "POS" will appear on the left sidebar of the admin screen. POS has now been added to your "Sales Channels".
Step 3: Add products to your store
If you don't have any "products" in your store, add them. You can add "products" from the Shopify admin screen or the Shopify app. (However, if you add a product from the Shopify app, it will not be published to other sales channels, so you will need to set it up separately.)
Here, we will briefly explain how to "add products" from the Shopify admin screen. If you have already added products, please proceed to the next step.
Click "Add product" in Product Management

To "add a product," log in to the administration screen and go to the "Product Management" page from "Product Management" on the left sidebar, as shown above.

Click the Add Product button.

Enter product details
On the product editing screen, you can register the following product information.
- Product name
- Product Description
- Product image
- Product Price
- Inventory (code and number of items in stock)
- Shipping settings (item weight and customs information)
- Product Variations
- SEO settings for product pages
Once you've entered your product information, don't forget to click "Save" at the end.
Set the "Sales Channel" for the product
We added POS as a "Sales Channel" in Step 2. Let's set POS as a sales channel for the products added in this section.

Click "Manage" under "Sales Channels" in the top right corner of the product management page.

Check the POS box in the image above to add the POS as a "sales channel."
Step 4: Set up taxes
Once you have added products to your store, you should also set up taxes. Setting up taxes is a two-step process:
- Check your store's location in "Location"
- Set up "Tax"
Check your store's location in "Location"
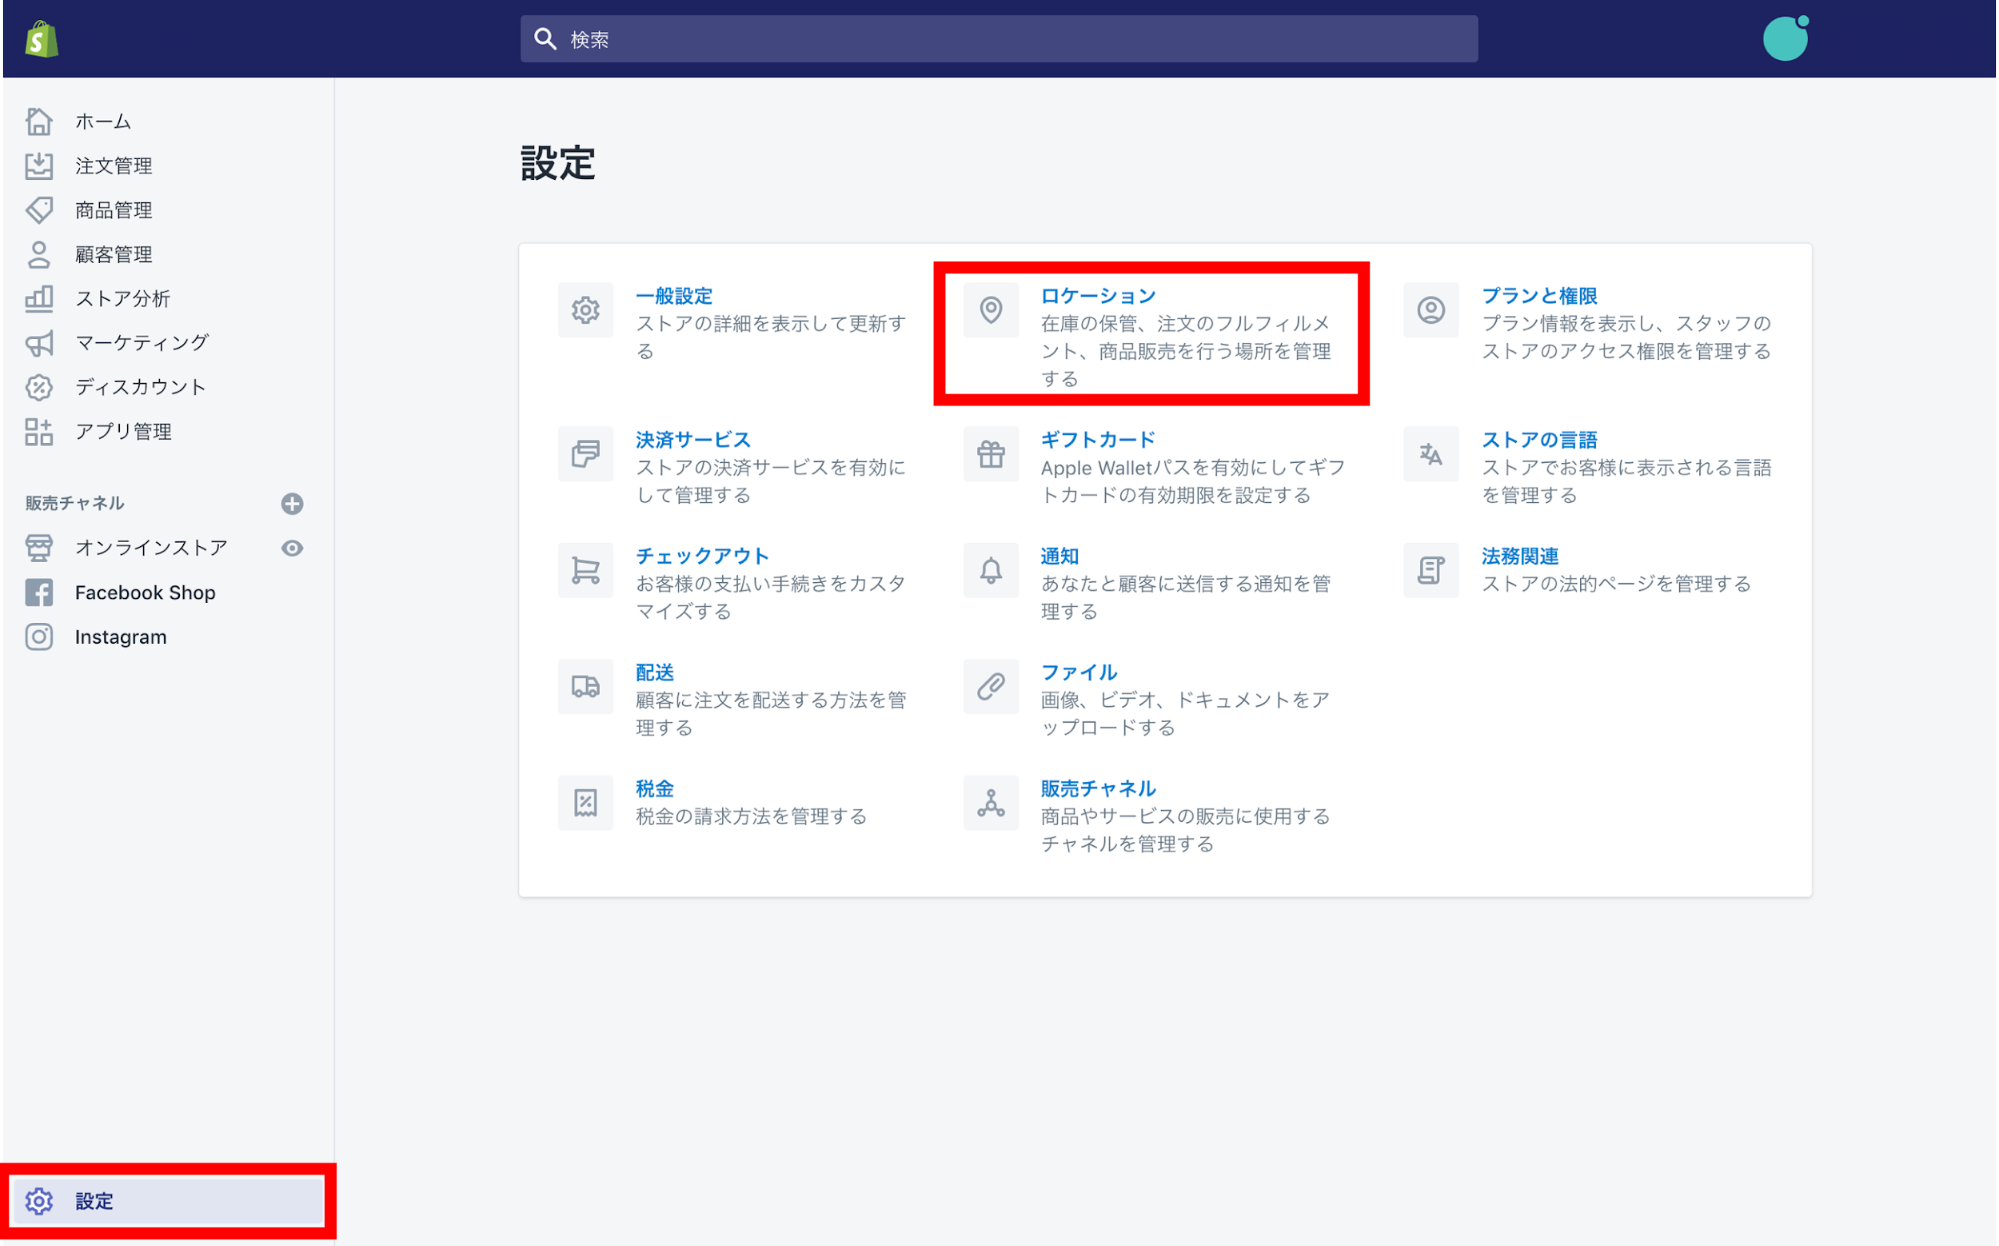
First, click "Location" from "Settings" on the home screen.

Check the location of your store on the "Location" screen. If you want to change the location, click "Add location."
Set up "Tax"

Next, click on "Settings" and then "Taxes."

Select a Tax Region.

If you are in Japan, set the tax to 10%. (As of May 11, 2020)
This covers the overall tax settings, but if there are items such as take-out items that require a "reduced tax rate" setting, you will need to make that setting separately.
However, it's easy to set up in Shopify. Click "Add tax override" at the bottom of the "Tax" settings screen above, and select the collection for which you want to set the "reduced tax rate." Just enter 8% as the tax rate. (You must first create the collection for which you want to set the reduced tax rate.)
Setting your taxes is important because different regulations govern the taxes that apply to your products depending on where your store is located, so make sure you set them accordingly.
Step 5: Set up your payment method
To ensure smooth payment processing for your customers, you should set up a payment method. Shopify offers its own payment service called "Shopify payments", and also has extensive integration with other external payment services.

You can set your payment method from the "Payment Settings" section on the "Settings" screen.
Please note that "payment settings" can only be registered or changed by the owner account. Staff accounts cannot perform this operation.
The following article compares payment services that can be used with Shopify and explains how to set them up. If you would like to know more about "payments", please refer to this article.
Step 6: Purchase and configure hardware
To take credit card payments, you will need external hardware such as a card reader. Here are some points to keep in mind regarding the hardware:
- Before ordering hardware, make sure it's supported by Shopify
- Please note that if you want to add a cash register or receipt printer, you will need to sign up for the "Standard Plan" or higher.
Once your hardware arrives, set it up using the Shopify POS app.
Depending on the device you are using the app on, you can do this from "Settings" > "Configure Hardware".
Step 7: Test your order to see if it works
Once you have set up the hardware, the last thing to do is to place a test order to check whether a series of transactions can be completed successfully.
Tips for payments when using Shopify POS
In this section, we will give you some tips on payment that you should know when actually using Shopify POS.
We recommend using it in conjunction with a mobile payment service.
As mentioned earlier, external hardware is required, but currently Shopify POS does not support credit card payments, QR code payments, or IC payments.
There is also a default Shopify terminal, but as of May 2020, it is only available overseas and requires third-party external hardware.
We recommend using mobile payment services such as Rakuten Pay, Square, and Air Pay in conjunction with Shopify POS.
Mobile payment is an electronic payment service that allows you to pay for things using devices such as smartphones and tablets.
There are several types of mobile payments:
- A type that reads credit cards and makes payments using a card reader
- Payment types include IC chip cards, Apple Pay, and mobile wallets.
- Payment is made by scanning a QR code or barcode with an app
In Japan, Rakuten Pay, which supports all of the above types, is popular.
Credit card payments are essential for foreign visitors to Japan
Especially if you are doing business in a tourist area, you will likely be dealing with foreigners, in which case credit card payment is essential.
In most developed countries, except for Japan, the "culture of using cards" is deeply rooted. We recommend that you prepare a card that can be used with internationally accepted credit cards such as VISA, MasterCard, and AMEX.
[TIPS] Shopify POS is available for just $9 per month! Shopify lite
Some of you may want to know more about Shopify POS.
"I don't have an e-commerce website yet, but I'd like to start selling products in a brick-and-mortar store."
"I have a website and I just want to implement EC functionality."
For such people, we recommend "Shopify lite". Shopify lite is a light plan that allows you to use Shopify's sales functions without building an EC site. The usage fee is 9 US dollars per month.
You can use Shopify's functions and admin panel while linking your existing website and social media accounts.
[Advantages of Shopify Lite]
- Available for $9 per month
- You can add a shop function to SNS
- Connect with your customers through Facebook Messenger
- Shopify POS app allows offline payments
Shopify lite is attractive for its smooth integration with social media. It has a particularly high affinity with Facebook, and you can easily enhance your product sales functions by adding a "Shop" section to your page.
The monthly fee is low and it is easy to implement, making it the perfect plan for those who already have a website and want to start selling and managing their products as soon as possible.
[Case Study] Shopify Usage Case Study
CALLMOON

Image source: CALLMOON website
CALLMOON sells handmade jewelry that recreates minimalist and elegant forms. They have an atelier in Taito-ku, Tokyo, and also operate an online shop.
[Key points for using Shopify]
- Dynamic product photos taken by designers
- Product descriptions are available in both Japanese and English
- The product list is carefully categorized into categories such as "New Products," "Rings," and "Earrings."
- Supports not only Japanese yen but also US dollars and euros
The website has been designed to be easy for foreigners to understand, with dynamic product photos and English and foreign currency notations.
He also participated in the "Shopify POPUP FESTIVAL", where our company previously had a booth, and said the following at the time:
"With Shopify POS, I can pack my products and take them to various events, while also managing my orders online."
This is a perfect example of Shopify POS being used in business settings.
[Related] Store operation using Shopify POS functions! POPUP event store opening report
GOOD COFFEE

Image source: Good Coffee Online Store
GOOD COFFEE serves coffee from famous roasters all over Japan. While they operate a number of brick-and-mortar stores called "THE LOCAL COFFEE STAND," they also operate an online shop using Shopify.
[Key points for using Shopify]
- Go from the official website to the online shop page in just one click
- Easy-to-understand information on roasters in each region, including Tokyo, Osaka, and Fukuoka
- "Mini mugs" and "paper drippers" are sold as companion items to coffee beans
- Introducing "coffee subscription" to purchase coffee beans at a fixed price
- Credit card and PayPal payments also accepted
This is an example of something that can only be achieved by a shop with a physical store, including smooth integration between the official website and online shop, detailed product introductions, and the introduction of subscriptions.
This shop also participated in the "Shopify POPUP FESTIVAL" introduced earlier.
[Summary] About Shopify POS
In this article, we have covered the following points about Shopify POS:
[Summary of this article]
- Shopify POS is a tool that allows you to manage product information for both physical and online stores.
- You can implement it in six steps, as described in this article.
- Better to use it in conjunction with a mobile payment service
- Shopify POS is also available on Shopify's Lite plan, which costs $9 per month.
By introducing Shopify POS, you can expect smooth integration between your physical store and online store. We hope you will find the information in this article useful for your own business.
[Related] Creating your own EC site with Shopify
*This article is current as of May 2020. Due to future updates or changes to Shopify specifications, it may not be possible to set up exactly as described in this article.


