Normally, you cannot edit the checkout screen in Shopify. However, in Shopify's highest-level plan, Shopify Plus, you can add UI by editing "checkout.liquid" and use the app "Script Editor" to customize discounts, shipping, and payment.
It has been officially announced that "checkout.liquid" will be discontinued on August 13, 2024, and the app "Script Editor" will also be deprecated and unsupported. If you want to maintain the customization of the checkout screen after that date, you will need to migrate to "Checkout Extensibiltiy". "Checkout Extensibiltiy" is a general term for functions that customize the checkout screen. This time, we will explain the overview and usage of "Shopify Functions", one of the functions of "Checkout Extensibiltiy".
Key points of this article
- You can understand the overview of Shopify Functions.
- You can build custom apps using Shopify Functions.
Important points to note about this article
- To build a custom app using Shopify Functions, you will need to use terminal software to enter commands, so you will need the skills to use terminal software.
What is Shopify Functions?
Shopify Functions is one of the "Checkout Extensions" that allows you to insert customized logic into Shopify's backend logic. The "Checkout Extension" uses Shopify Functions to customize discounts, shipping, and payment, which was previously done with the "Script Editor".
Also, since Shopify Functions is installed as an app to the store, you can search for an app with Shopify Functions that meets your requirements from the store and install it, or you can create your own custom app and install it to your store. Furthermore, Shopify Functions can be used by installing it from the store even in stores with plans other than Shopify Plus.
*Custom apps are only available to stores with a Shopify Plus plan.
Shopify Functions API Types
Shopify Functions offers several APIs, each with different customization options. Below is a list of the types and overviews of the APIs currently available and those scheduled to be released in the future. It seems that the number of available APIs will continue to increase.
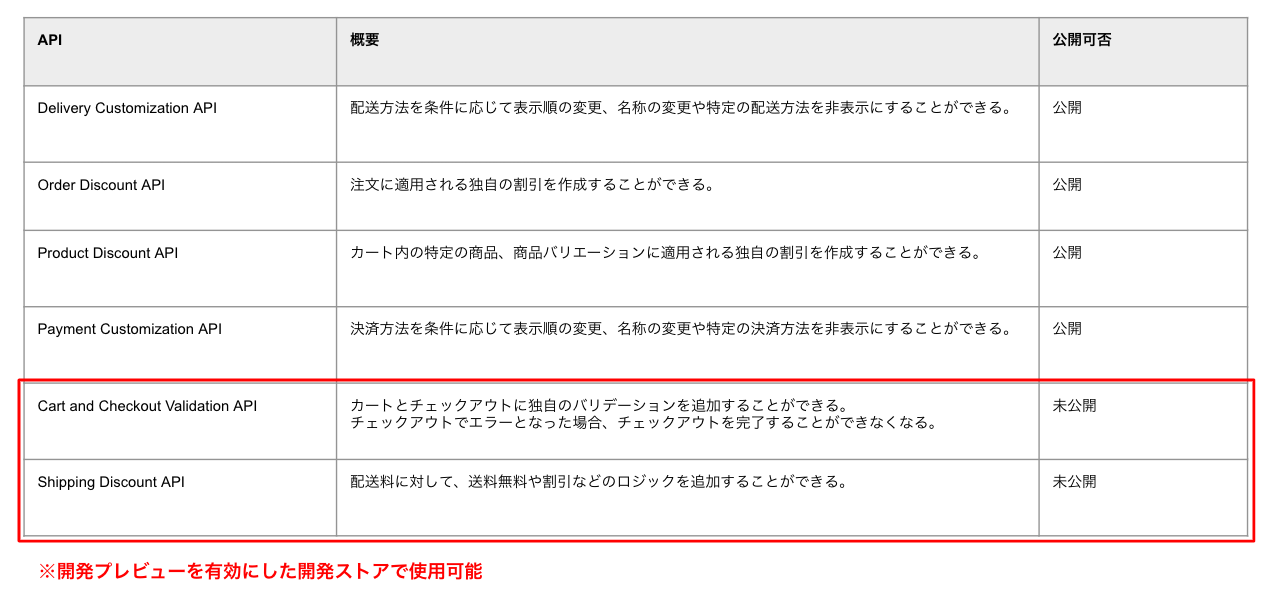
*As of August 1, 2023
How to create a Shopify Functions app
I will explain how to create an app using Shopify Functions. In this article, I will use the "Cart and Checkout Validation API" to add validation to the checkout screen.
This time, we will create a validation that prevents checkout if the total number of purchases for an order exceeds 10. The validation will be executed when the user transitions to the checkout screen.
The "Cart and Checkout Validation API" performs validation not only on the checkout screen but also on cart operations (adding items to the cart, changing the quantity), but depending on the content of the validation, there may be cases where you do not want it to run when operating the cart.
Advance preparation
- Creating a development store with the Checkout Extensibility developer preview enabled
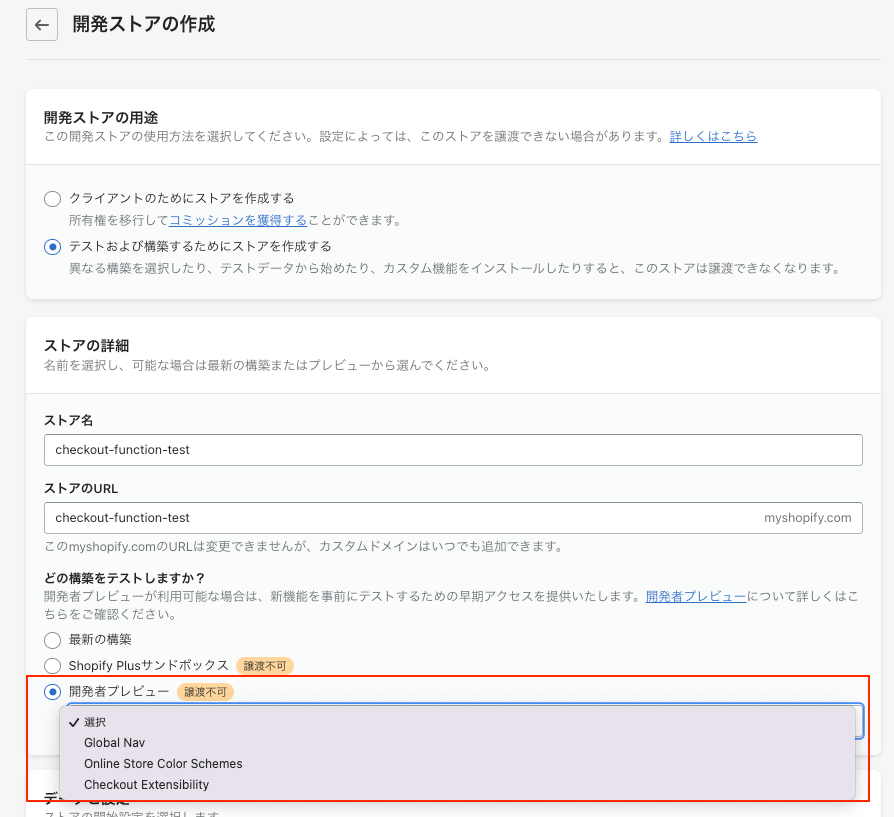
Install the tools required to create the app on your local PC.
- Node.js *Version 16 or later
- Node.js package managers (npm, yarn)
- ShopifyCLI *Version 3 or later
Install our app
First, create the main body of the app. Shopify Functions is an extension of the app, so you need to create the main body of the app first.
1. Launch the terminal and execute the following command in an appropriate directory.
npm init @shopify/app@latest
2. After executing the command, you will be asked to enter the project name and language to be used.
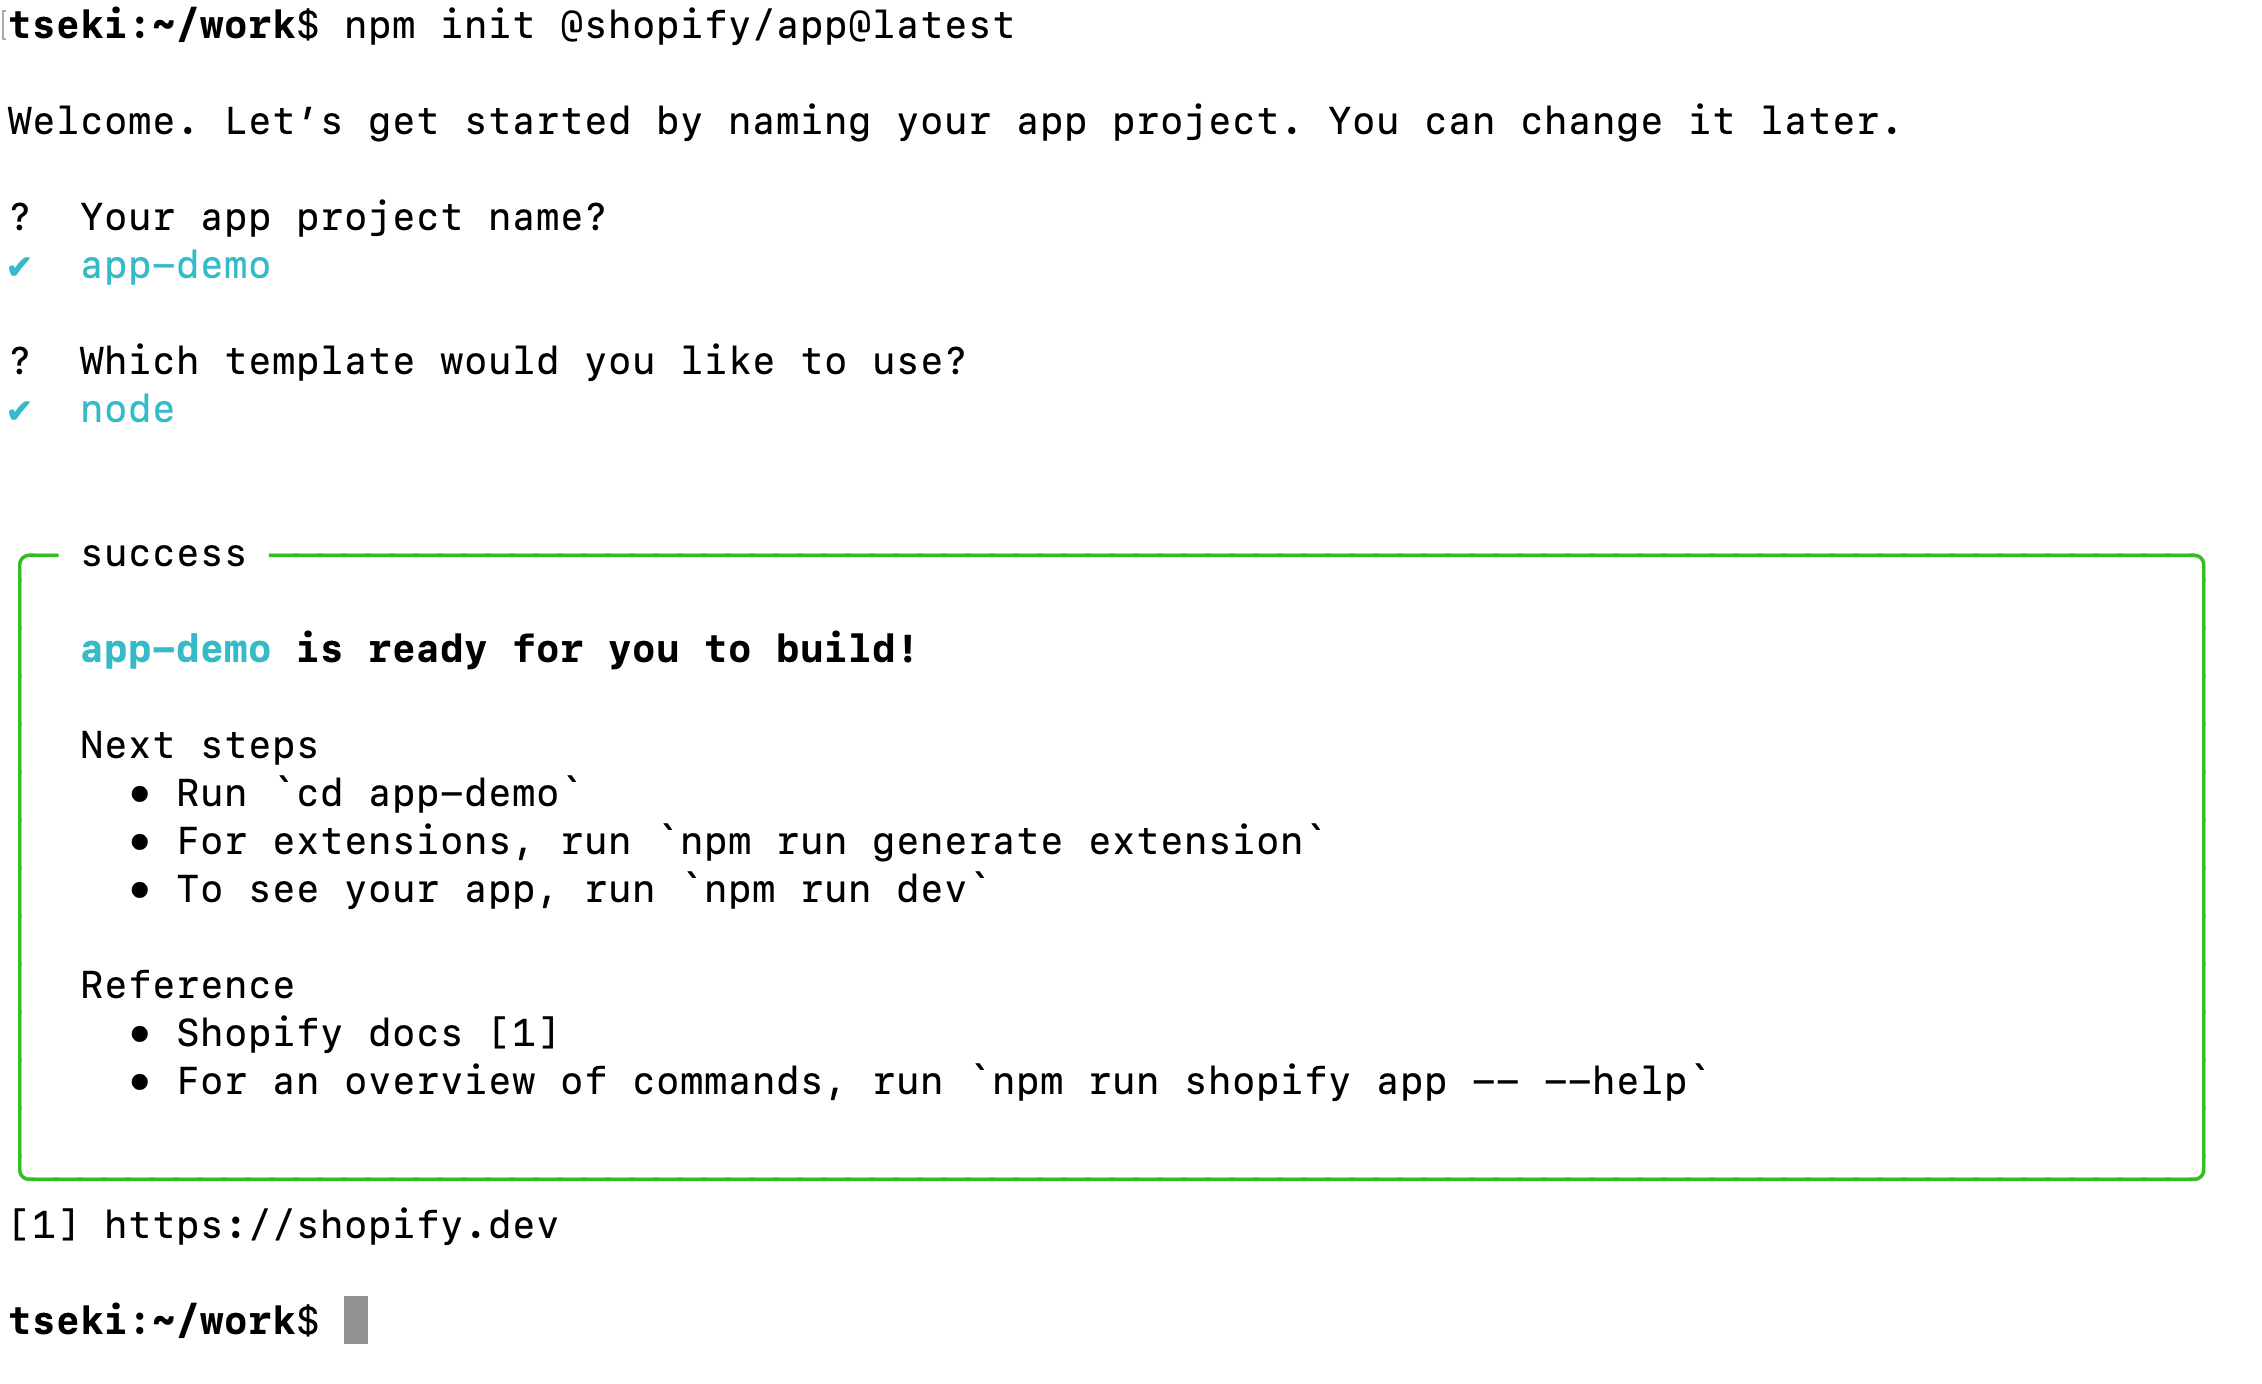
- Your app project name?: Enter the project name. This will become the directory name.
- Which template would you like to use?: Select the programming language for the app. There are three languages to choose from: Node, PHP, and Ruby.
3. Change to the app directory:
cd app-demo/
4. Start the local server for the app by running the following command:
npm run dev
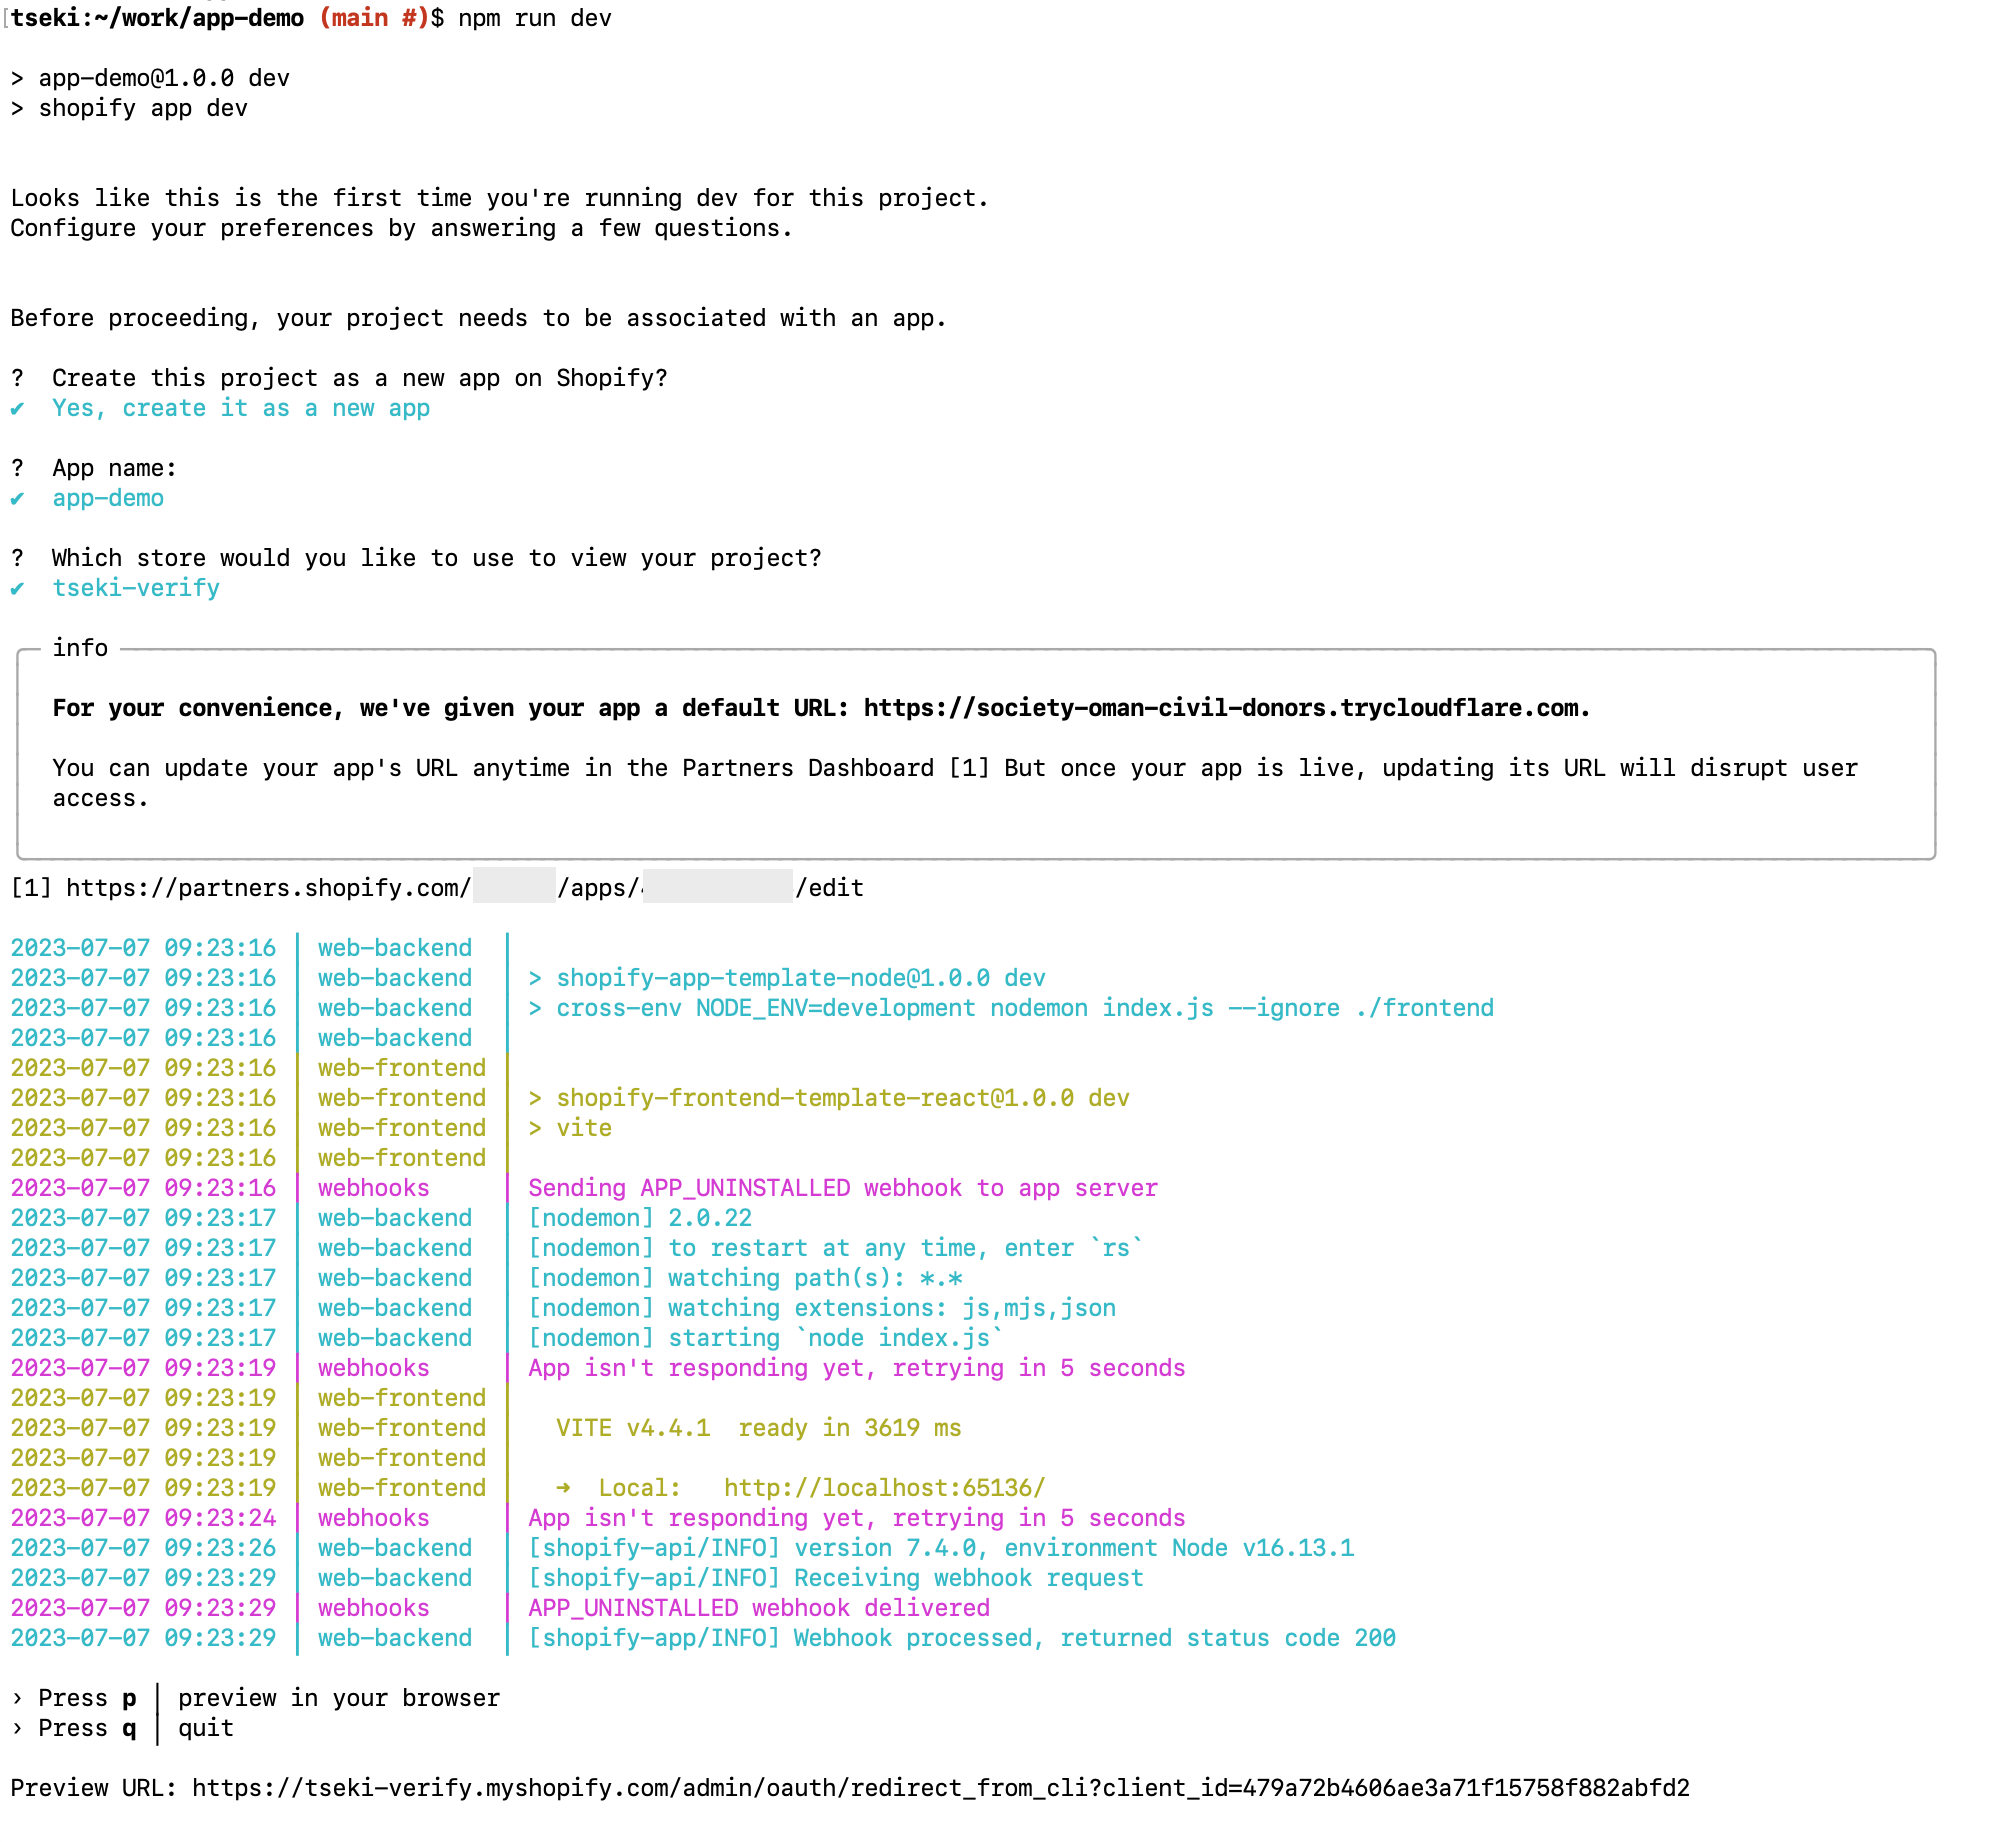
- Create this project as a new app on Shopify?: Choose whether to create a new app in your Partner Dashboard or overwrite an existing app.
- App name: Enter the app name.
- Which store would you like to use to view your project?: Select the store you want to install from. *You can install from a store you did not select here later.
- Preview URL: This is the installation URL for the selected store. You can easily install the app on your store by accessing this URL.
If you select PHP or Ruby, you will need to set up the app separately.
PHP: Set up a Laravel app
Ruby: Set up a Rails app
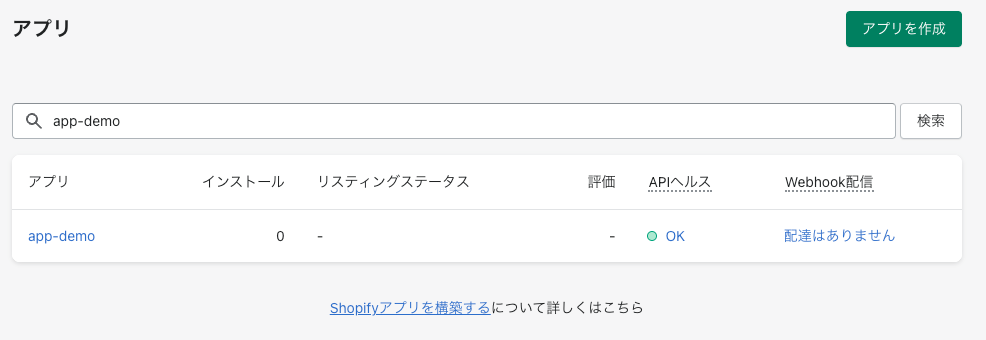
5. You can now see the app you created under App Management in your Partner Dashboard.
6. Install it in the store.
With the local server running, access "Preview URL".
The installation screen will appear and once installed, the app's management screen will appear.
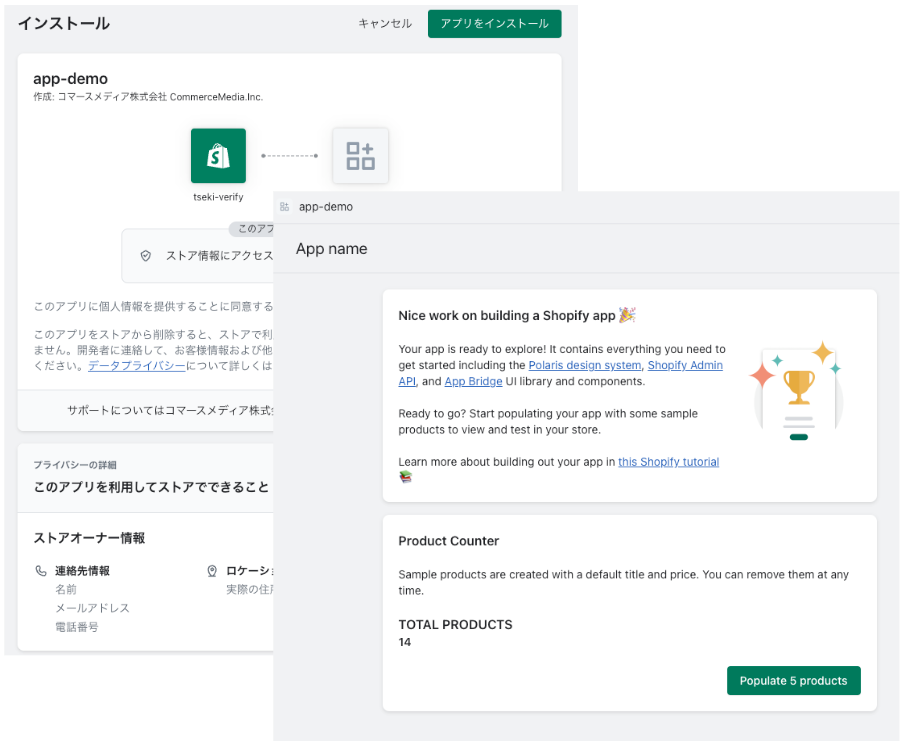
Now you can install the app in the store.
Install Shopify Functions
From here, we will install the Shopify Functions extension to the app we just created.
1. Launch a terminal and navigate to the directory of the app you just created.
cd app-demo/
2. Run the following command to install the "Cart and Checkout Validation API" extension.
npm run shopify app generate extension -- --type cart_checkout_validation
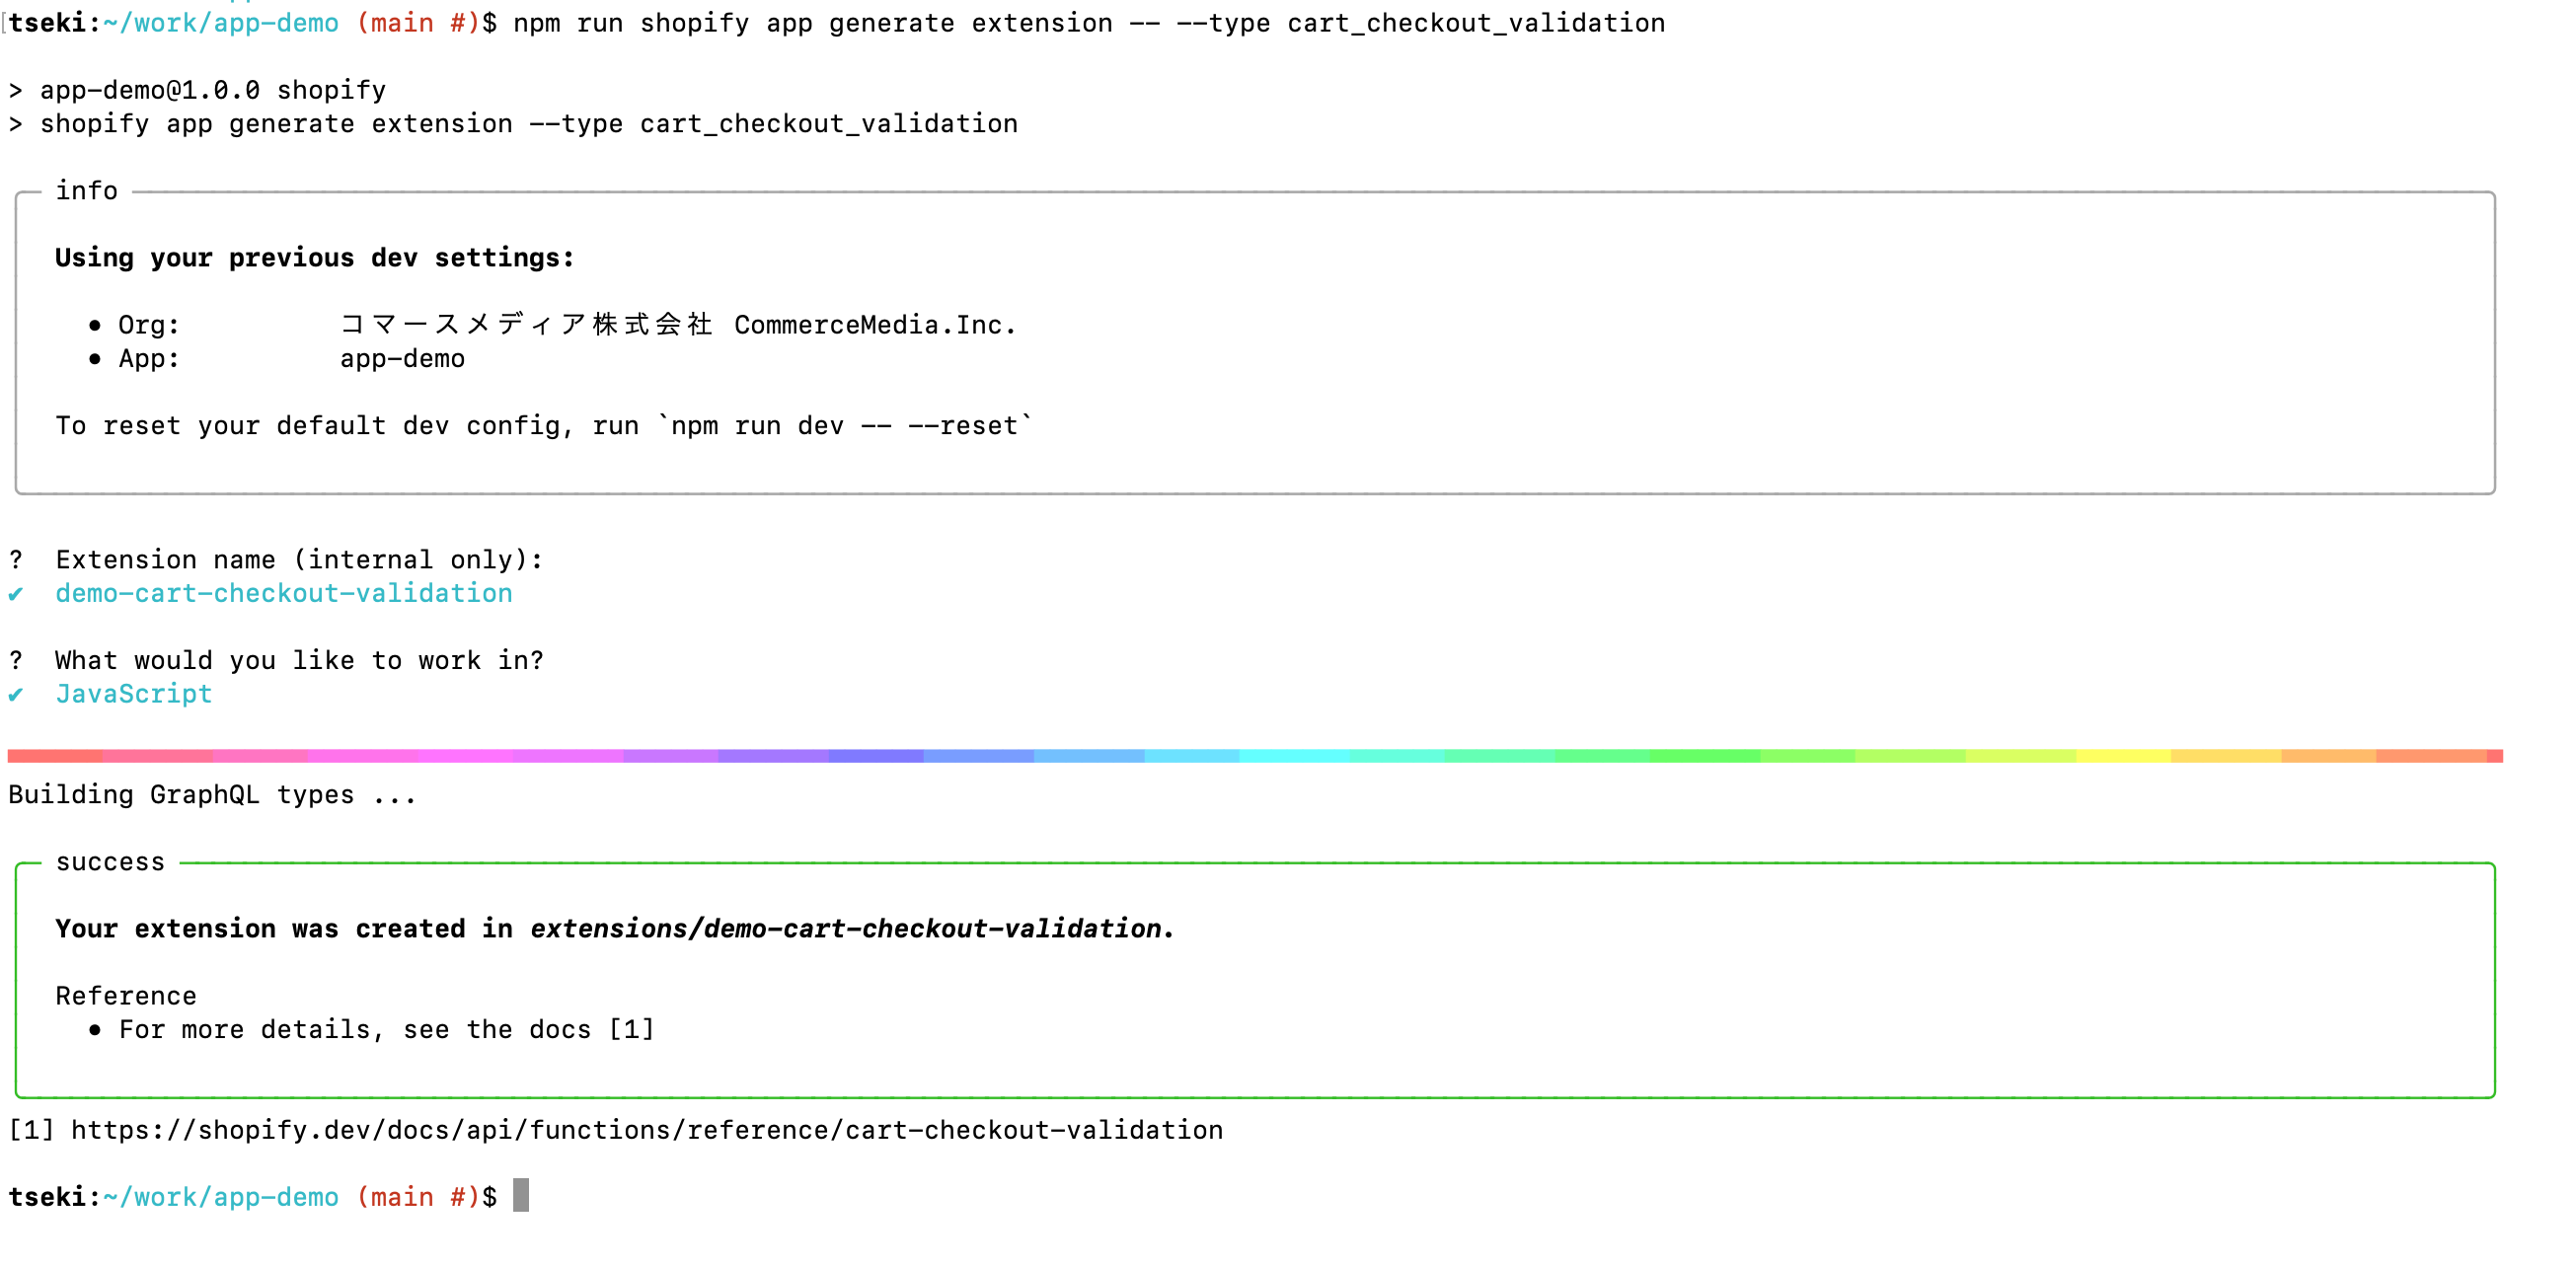
- Extension name: Enter a name for your extension.
- What would you like to work in?: Enter the programming language you want to use to implement the extension. You can choose from JavaScript, Typescript, and Rust.
3. Change to the directory of the installed extension.
cd extensions/demo-cart-checkout-validation/
4. Replace input.graphql with the following code:
input.graphql defines the query to pass data from the front end to Shopify Functions.
 query Input {
 buyerJourney {
 step
 }
 cart {
 lines {
 quantity
 }
 }
 }
5. If you are using JavaScript, run the following command to regenerate your types:
npm run shopify app function typegen
6. Replace src/index.js with the following code:
src/index.js is a program file that performs processes such as validation based on the data passed in the query defined in input.graphql.
 // @ts-check

 /**
 * @typedef {import("../generated/api").InputQuery} InputQuery
 * @typedef {import("../generated/api").FunctionResult} FunctionResult
 */

 export default /**
 * @param {InputQuery} input
 * @returns {FunctionResult}
 */
 (input) => {
 const errors = [];

 // カート操作でのバリデーションはスキップする
 if (input.buyerJourney.step == 'CART_INTERACTION') {
 return { errors };
 }

 // カートの購入個数をカウント
 let totalQuantity = 0;
 input.cart.lines.forEach((line) => {
 totalQuantity += line.quantity;
 });

 if (totalQuantity > 10) {
 errors.push(
 {
localizedMessage: "Orders with a total purchase quantity of more than 10 items cannot be checked out.",
 target: "$.cart"
 }
 );
 }

 return {
 errors
 }
 };
7. Go to the app directory and deploy the app:
cd ../.. && npm run deploy
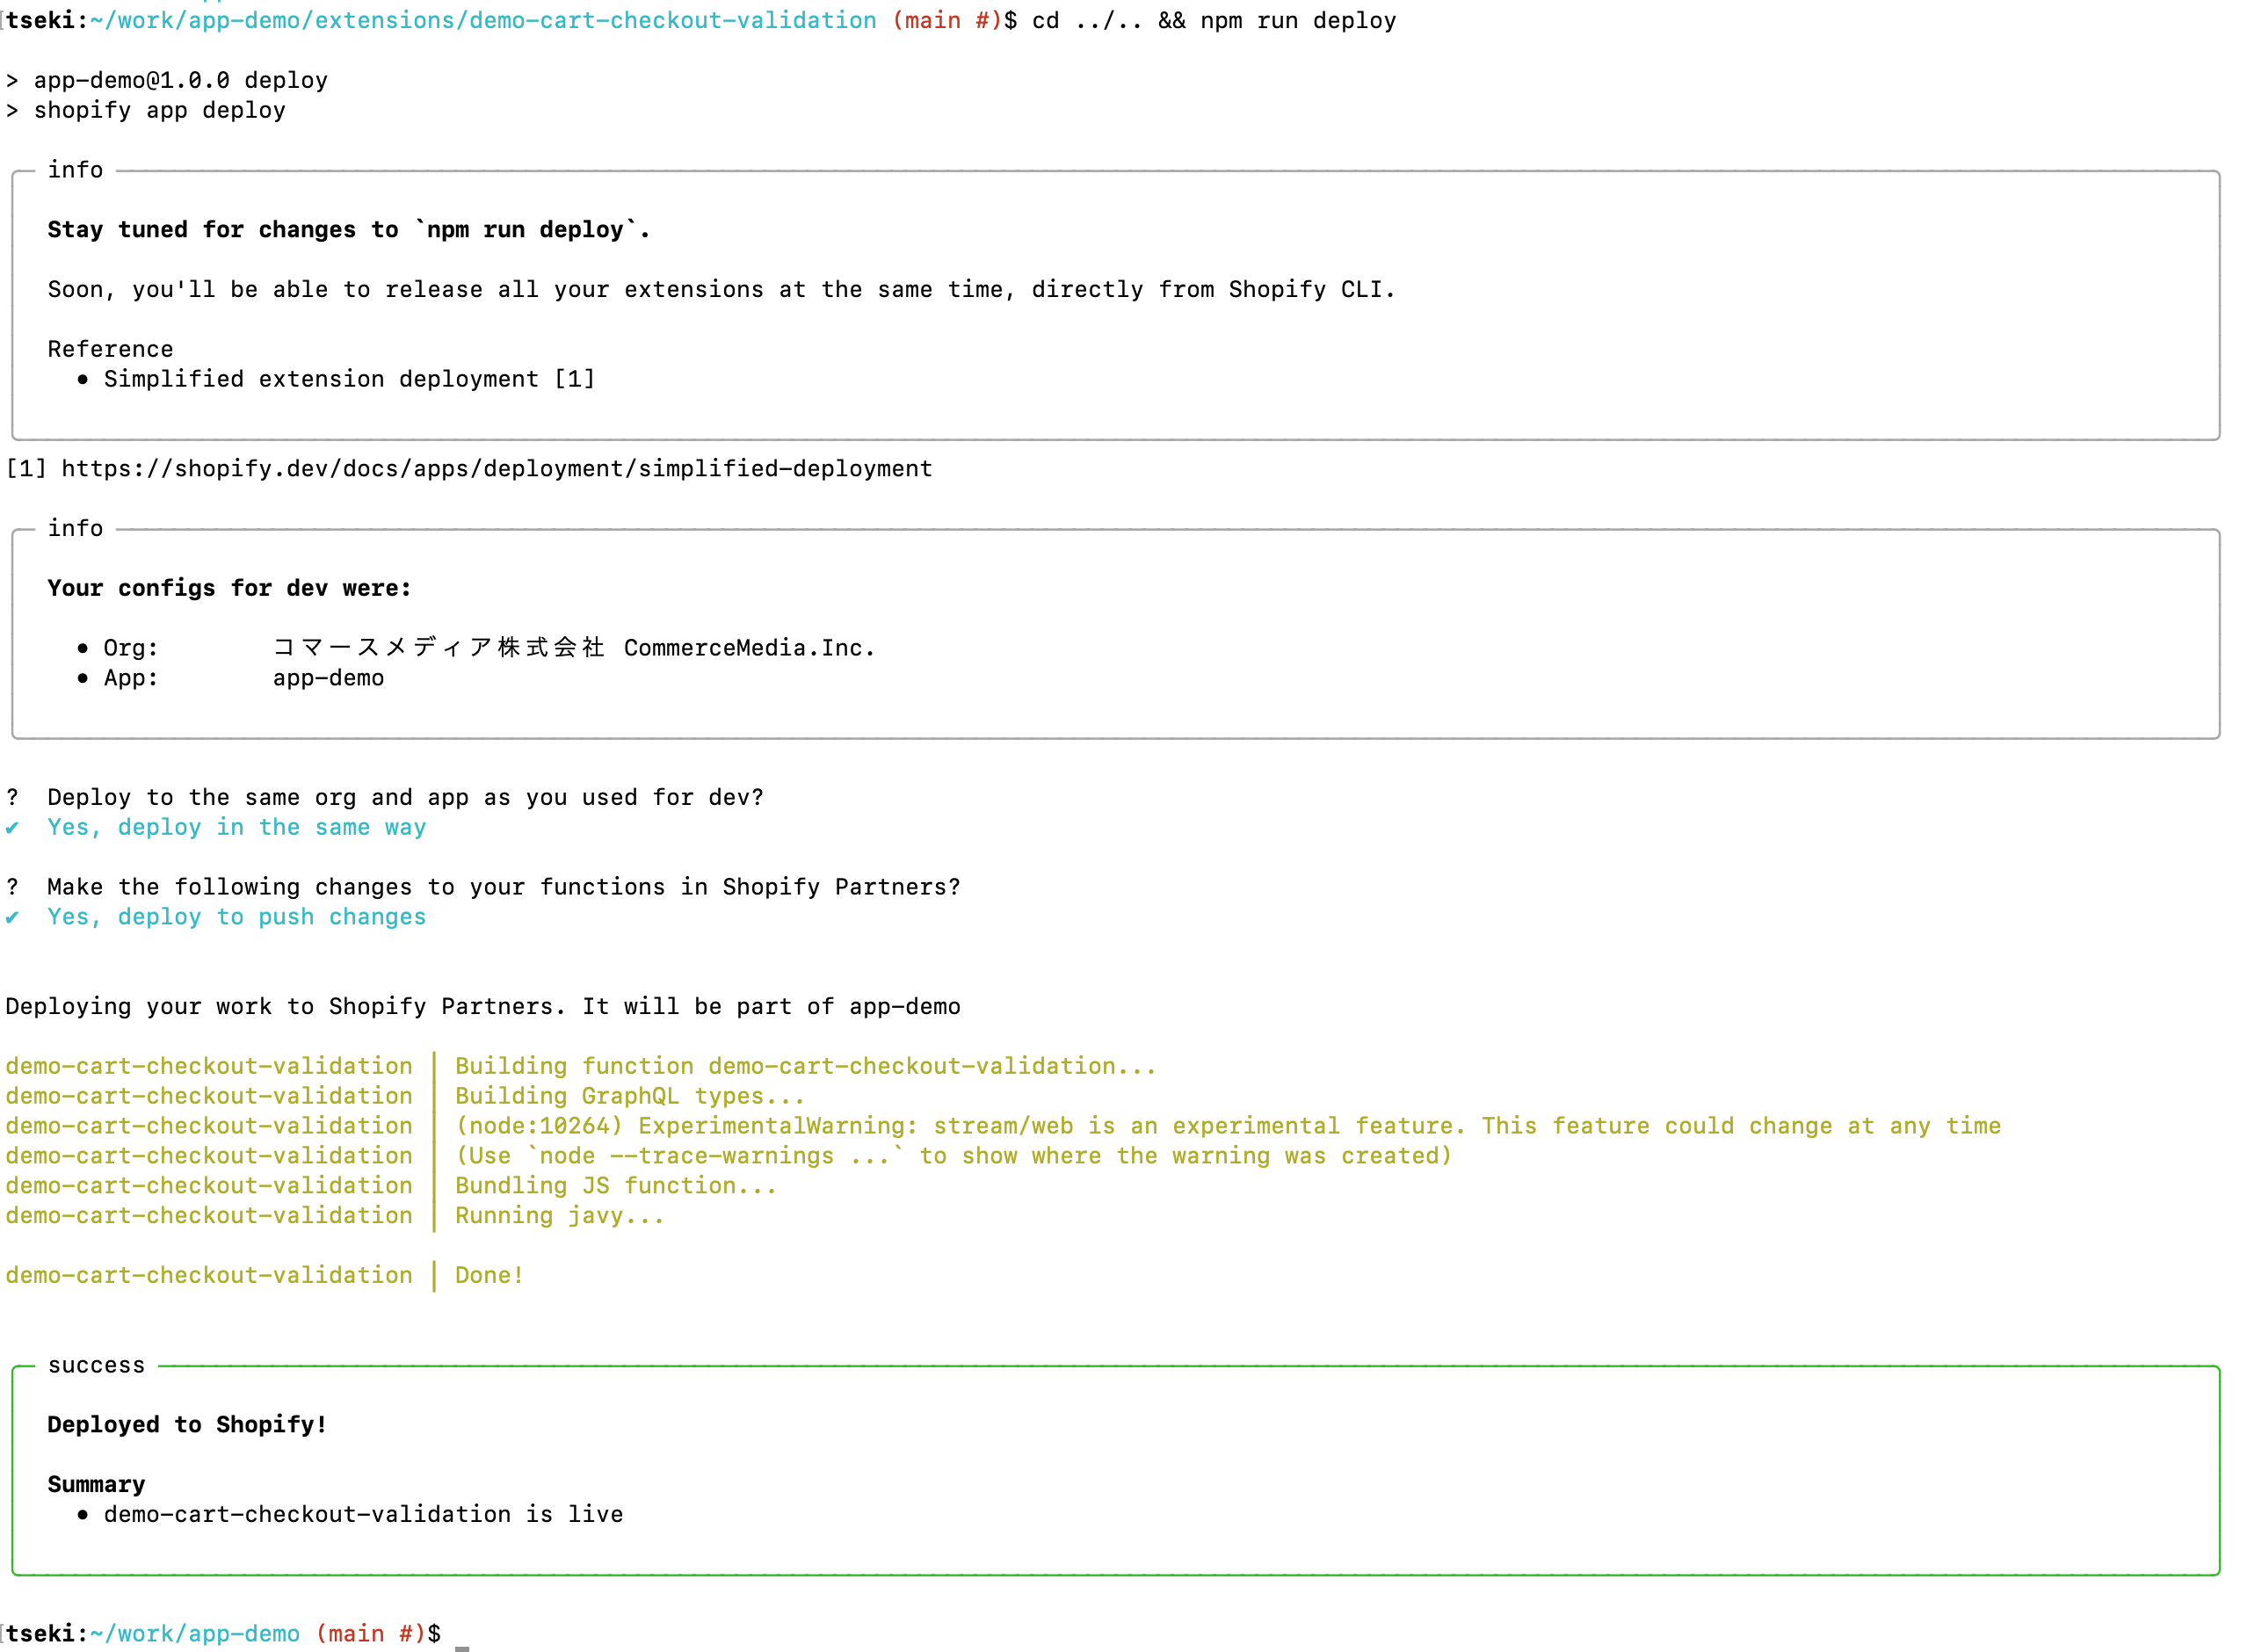
- Deploy to the same org and app as you used for dev?: You will be asked if the partner account is correct. If there is no problem, select Yes. *This will only be asked the first time you deploy.
- Make the following changes to your functions in Shopify Partners?: You will be asked if you want to deploy and make changes. If there are no problems, select Yes.
8. You can now see the Shopify Functions extension deployed to your app in the Apps section of your Partner Dashboard.

9. Enable the deployed extension in the installed store.
Go to the "Checkout" screen under "Settings" in the admin panel and add the deployed extension to "Checkout Rules".
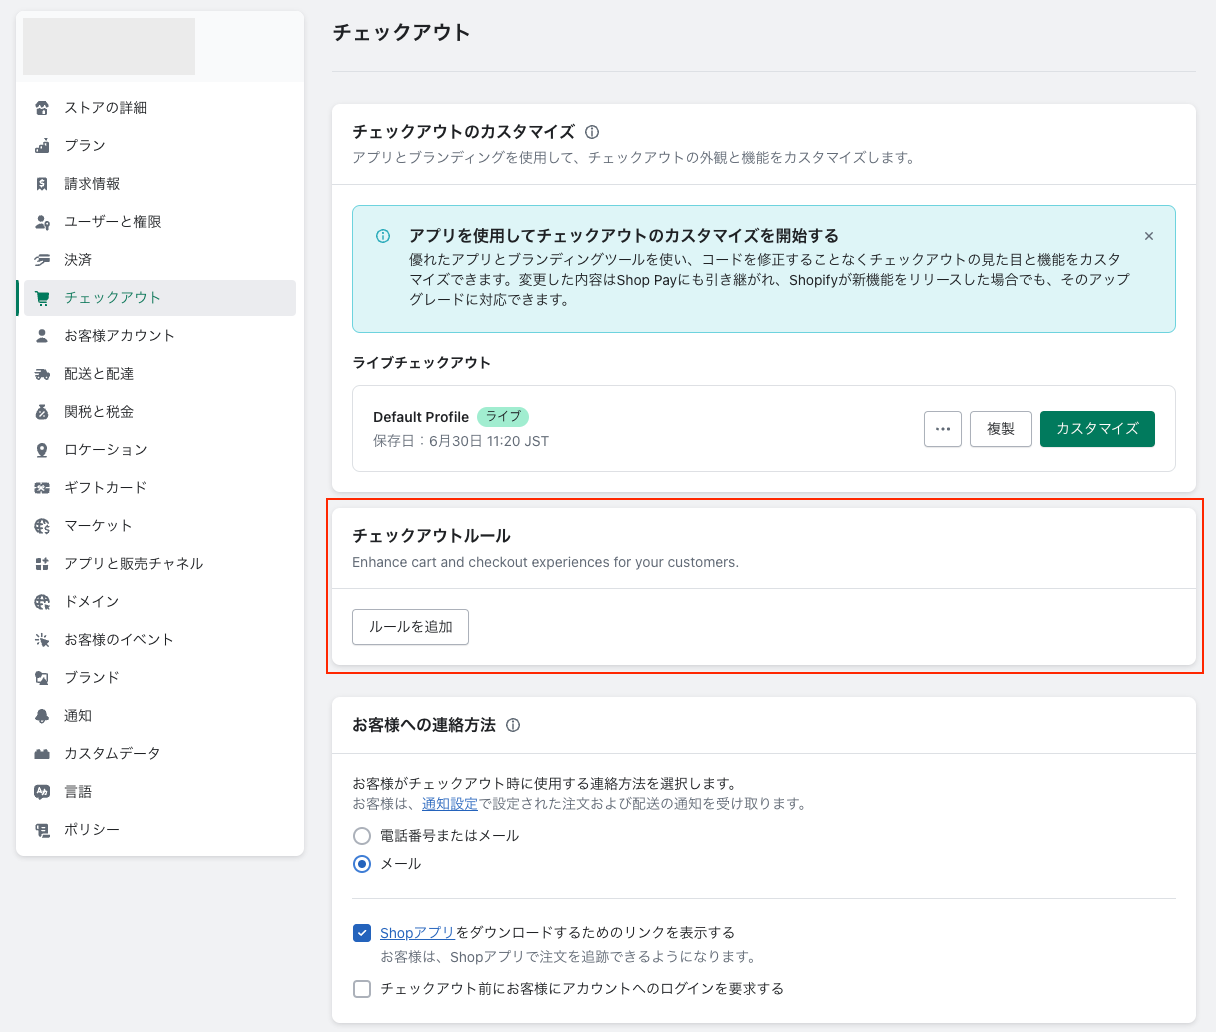
Click the "Add rule" button, select the extension you deployed, set the status to "Enabled", and click the "Add rule" button.
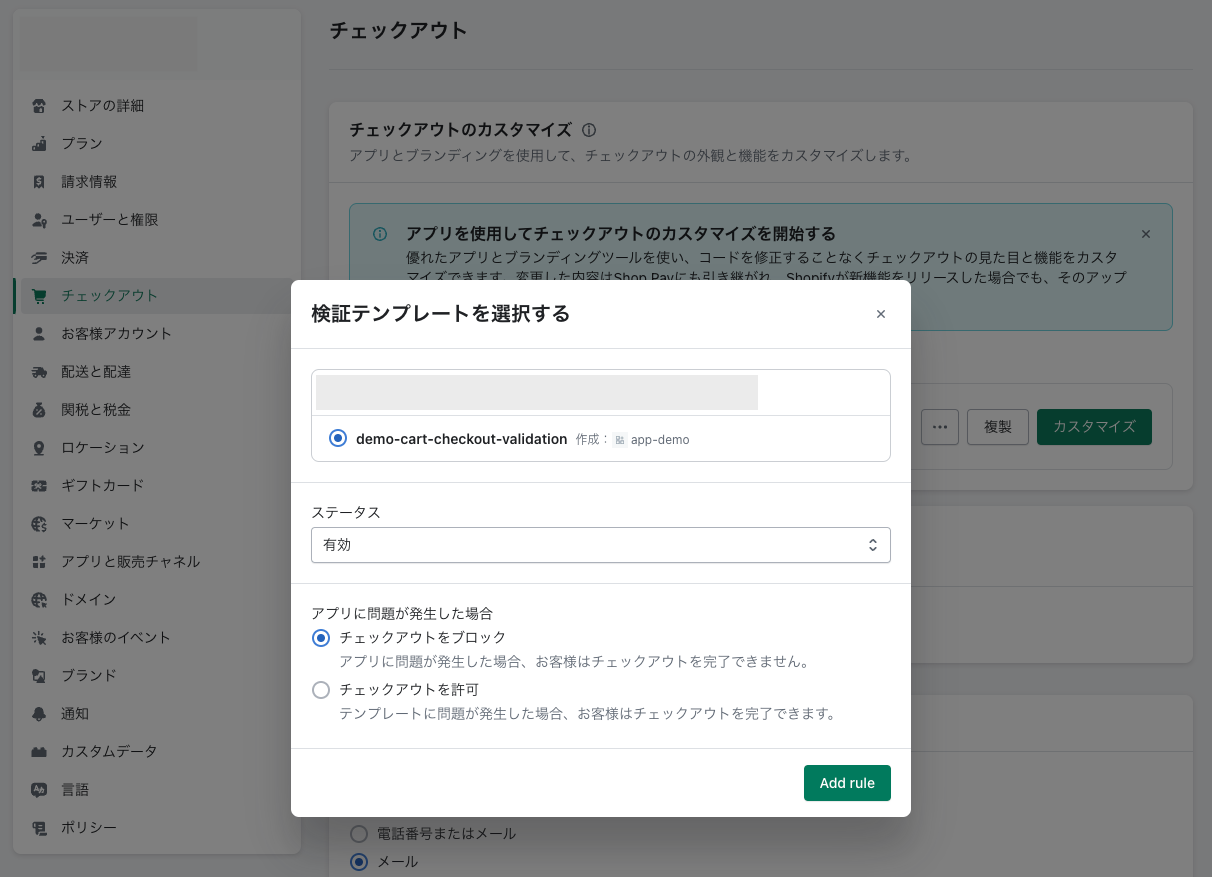
In this example, select “demo-cart-checkout-validation”.
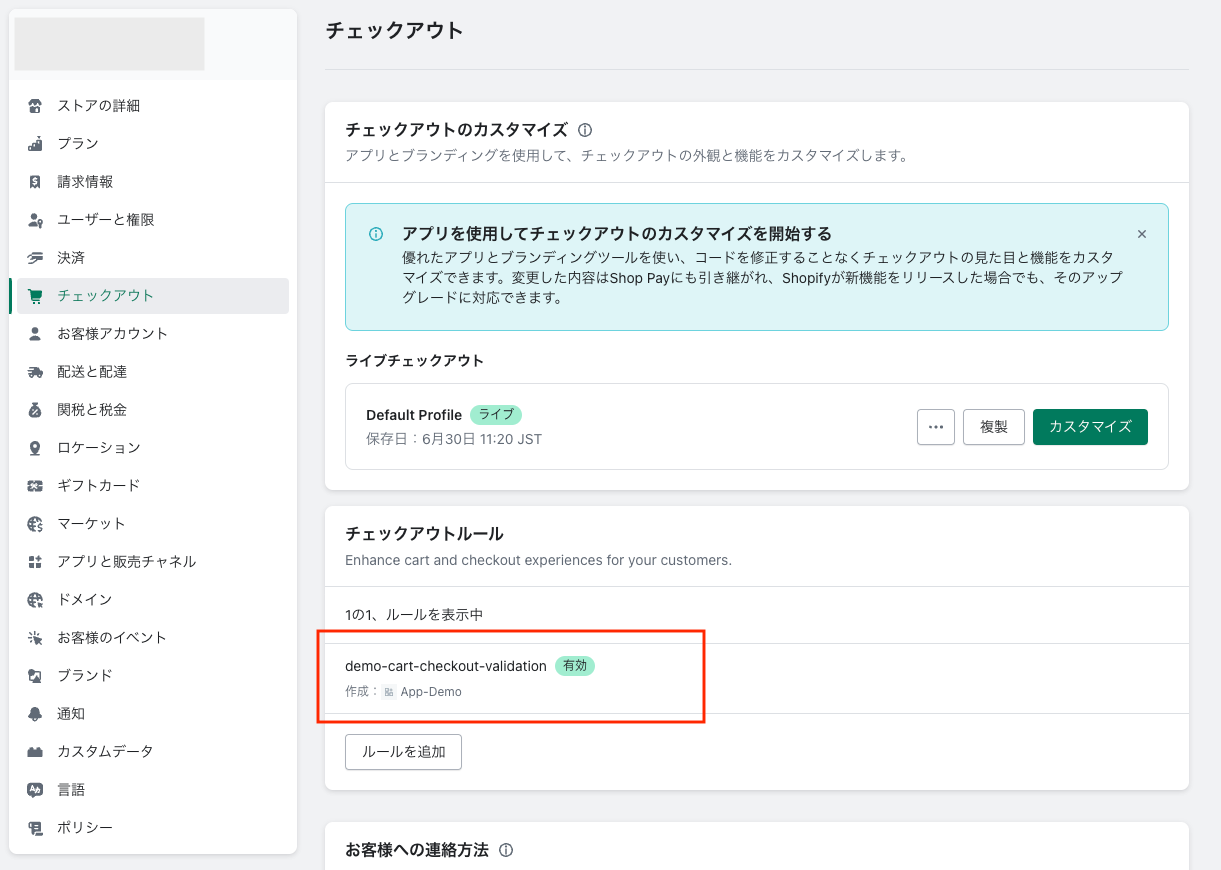
At this point, you can set up the "Cart and Checkout Validation API" extension in your store.
Check out Shopify Functions in action
Let's take a look at how the "Cart and Checkout Validation API" extension works.
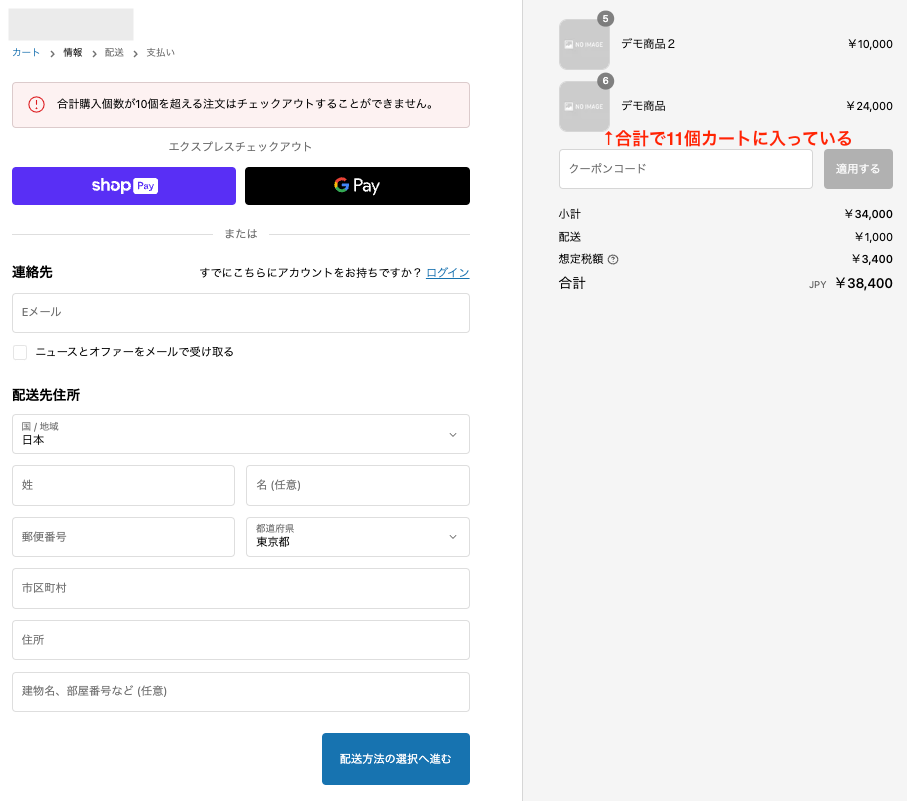
Now, if the number of items you add to your cart on the checkout screen exceeds 10, an error message will appear on the checkout screen and you will not be able to check out.
lastly
This time, I introduced how to use the "Cart and Checkout Validation API" of Shopify Functions. This time, I implemented simple logic to validate the total number of items in the cart, but it seems possible to implement more complex validations such as validation using product metafields and tags, and validation involving customer information.
As mentioned briefly at the beginning, Shopify Functions also provides other APIs that allow you to customize discounts, shipping, and payment methods.
Furthermore, for custom apps, Shopify Functions can be deployed and run on Shopify's servers. This means you don't need to prepare your own server, so you can use it without having to manage and operate the server.
*If you need an app management screen, a server is required.
"Checkout Extension", which includes Shopify Functions, also has features that allow you to add UI to the checkout screen, change the design, etc. I will introduce these in another article.
We also undertake site construction using Shopify Plus, including customizing the checkout screen. Please feel free to contact us using the contact form.


